Apple Sugar Cookies

Apple Sugar Cookies
Cookie Ingredients:
5 C flour
2 tsp baking powder
1 tsp salt
1 1/2 C soft unsalted butter
2 C granulated sugar
4 eggs
Cookie Directions:
– Cream the soft butter with the sugar until the combination is smooth not grainy to the touch in a mixing bowl.
-Add all 4 eggs at one time…Continue to mix. -Add the vanilla.. Continue mixing.
-Sift the four, baking powder, and salt together.
-Add the dry mixture to the wet mixture.
-Continue mixing to make sure all ingredients are thoroughly blended.
-Make the dough into a ball, wrap it in cling wrap completely covering the entire dough ball.
-Put in the refrigerator for about 6 hours or overnight. Check to see if the dough is firm.
-Preheat oven to 325 degrees.
-Pull the cookie dough out of the refrigerator and sit it out to soften up a bit.
– Put flour out on the wood cutting board, rub flour on the rolling pin, and work some flour into the batter.
-Roll the dough out on the cutting board and using your APPLE cookie cutter begin to make your cookies.
-Line the cookie sheet with parchment paper.
-Using a metal spatula move the cut cookie to the parchment lined cookie sheet.
-Bake at 325 degrees for 8 minutes. Check to see if the cookie are thoroughly baked.
-Take the cookies off of the cookie sheet and put on a wire rack to cool completely. (About 10 minutes).
Royal Icing:
Icing Ingredients:
2 egg whites
1 C powder sugar
1/2 tsp cream of tartar
Red, brown, green gel food coloring
(For these cookies you may have to make two bowls of icing).

Icing Directions:
-Combine all ingredients in a mixing bowl mixing on medium speed for 4 minutes. (except your food coloring)
-If icing is not stiff enough add 1/4 C powder sugar.
– Leave icing in large bowl. Take out 4 bowls, put 1/4 C of icing in three bowl and the rest of the icing in the fourth bowl.
-Bowl #1 remains white, bowl #2 , add several drops of brown gel food coloring stirring well until all of the color is blended. Bowl #3, add several drops of green gel food coloring stirring well until all of the color is blended.
-As for the largest amount of icing add several drops of red gel food coloring in the bowl of icing … stir well to mix the color. (Red is a difficult color to get so you may have to continue to add the food coloring to get the bright deep red color. That is why we use a gel food color as it doesn’t water down the icing.)
-Spoon each of the icings into individual frosting bags with a #5 tips…. twist the open end of the bag to push the icing to the tip.

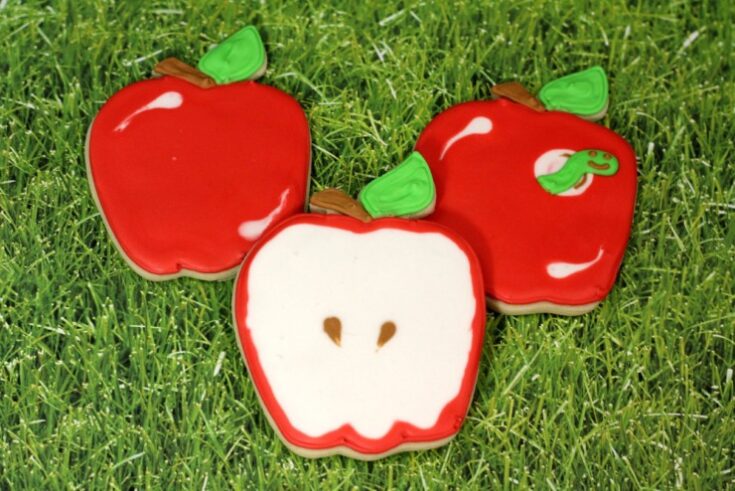
Whole Red Apple:
-First step for each of the completely red apple cookies outline it in red except for the stem and leaf.
-Allow the red outline at least 30 seconds to dry before filling the body of the cookie in with the other red icing*. ( After outlining all of the apple cookies you can push the remaining icing into a bowl and add the 1 tsp of water and mix well to get the right consistency .Using a butter knife to spread it from the outlined part inwards to the center.
-Immediately, before the red icing dries, add a small drop of white icing and use a toothpick to drag the white icing up the side of the apple. (Following the example.)
-Outline the stem with brown icing on all of the same apple cookies, fill them in with the thinner icing.
-Outline the green leaf with the green icing on all of the same apple cookies, fill them in with the thinner icing.
-Set these aside and allow to completely dry about 4 hours.

Apple with white apple flesh and brown seeds:
-Outline the apple with the red icing leaving the stem and leaf untouched. Allow 30 seconds for the red outline to dry.
-Outline the apple flesh with white icing. Thin out the icing as per the instructions above. Using a knife spread the icing around the flesh of the red apple. Immediately, before the white icing dries, add two small drops of brown icing for the apple seeds. Drag a little of the brown icing down to make the dot look like an apple seed.
-Complete the stem and leaf as per the instructions for the whole red apple.
-Allow to dry for 4 hours.

Red Apple with Worm:
-Follow the instructions on the first apple including the stem, leaf, and white spots on the apple.
-Add one small white round about the size of a dime, immediately drawing a thin brown line in the circle about a third of the way around the circle. Hand outline a green worm and fill it in. Allow to dry for 30 seconds and all the two eyes and a smile or mouth.
-Allow 4 hours for cookie to completely dry.
Apple Sugar Cookies
Ingredients
Cookie Ingredients
- 5 C flour
- 2 tsp baking powder
- 1 tsp salt
- 1 1/2 C soft unsalted butter
- 2 C granulated sugar
- 4 eggs
Icing Ingredients
- 2 egg whites
- 1 C powder sugar
- 1/2 tsp cream of tartar
- Red, brown, green gel food coloring
- ., For these cookies you may have to make two bowls of icing
Instructions
Cookie Directions
- - Cream the soft butter with the sugar until the combination is smooth not grainy to the touch in a mixing bowl.
- -Add all 4 eggs at one time...Continue to mix. -Add the vanilla.. Continue mixing.
- -Sift the four, baking powder, and salt together.
- -Add the dry mixture to the wet mixture.
- -Continue mixing to make sure all ingredients are thoroughly blended.
- -Make the dough into a ball, wrap it in cling wrap completely covering the entire dough ball.
- -Put in the refrigerator for about 6 hours or overnight. Check to see if the dough is firm.
- -Preheat oven to 325 degrees.
- -Pull the cookie dough out of the refrigerator and sit it out to soften up a bit.
- - Put flour out on the wood cutting board, rub flour on the rolling pin, and work some flour into the batter.
- -Roll the dough out on the cutting board and using your APPLE cookie cutter begin to make your cookies.
- -Line the cookie sheet with parchment paper.
- -Using a metal spatula move the cut cookie to the parchment lined cookie sheet.
- -Bake at 325 degrees for 8 minutes. Check to see if the cookie are thoroughly baked.
- -Take the cookies off of the cookie sheet and put on a wire rack to cool completely. (About 10 minutes).
Icing Directions
- -Combine all ingredients in a mixing bowl mixing on medium speed for 4 minutes. (except your food coloring)
- -If icing is not stiff enough add 1/4 C powder sugar.
- - Leave icing in large bowl. Take out 4 bowls, put 1/4 C of icing in three bowl and the rest of the icing in the fourth bowl.
- -Bowl #1 remains white, bowl #2 , add several drops of brown gel food coloring stirring well until all of the color is blended. Bowl #3, add several drops of green gel food coloring stirring well until all of the color is blended.
- -As for the largest amount of icing add several drops of red gel food coloring in the bowl of icing ... stir well to mix the color. (Red is a difficult color to get so you may have to continue to add the food coloring to get the bright deep red color. That is why we use a gel food color as it doesn't water down the icing.)
- -Spoon each of the icings into individual frosting bags with a #5 tips.... twist the open end of the bag to push the icing to the tip.
Whole Red Apple
- -First step for each of the completely red apple cookies outline it in red except for the stem and leaf.
- -Allow the red outline at least 30 seconds to dry before filling the body of the cookie in with the other red icing*. ( After outlining all of the apple cookies you can push the remaining icing into a bowl and add the 1 tsp of water and mix well to get the right consistency .Using a butter knife to spread it from the outlined part inwards to the center.
- -Immediately, before the red icing dries, add a small drop of white icing and use a toothpick to drag the white icing up the side of the apple. (Following the example.)
- -Outline the stem with brown icing on all of the same apple cookies, fill them in with the thinner icing.
- -Outline the green leaf with the green icing on all of the same apple cookies, fill them in with the thinner icing.
- -Set these aside and allow to completely dry about 4 hours.
Apple with white apple flesh and brown seeds
- -Outline the apple with the red icing leaving the stem and leaf untouched. Allow 30 seconds for the red outline to dry.
- -Outline the apple flesh with white icing. Thin out the icing as per the instructions above. Using a knife spread the icing around the flesh of the red apple. Immediately, before the white icing dries, add two small drops of brown icing for the apple seeds. Drag a little of the brown icing down to make the dot look like an apple seed.
- -Complete the stem and leaf as per the instructions for the whole red apple.
- -Allow to dry for 4 hours.
Red Apple with Worm
- -Follow the instructions on the first apple including the stem, leaf, and white spots on the apple.
- -Add one small white round about the size of a dime, immediately drawing a thin brown line in the circle about a third of the way around the circle. Hand outline a green worm and fill it in. Allow to dry for 30 seconds and all the two eyes and a smile or mouth.
- -Allow 4 hours for cookie to completely dry.
Nutrition Information:
Serving Size:
1 gramsAmount Per Serving: Unsaturated Fat: 0g

Recipe and Photos by Chef Amber of Hot Springs, Arizona for FrugalMomEh.com


I love these cookies, so adorable and not too difficult to make.
These are so well done! I need to try that icing, so I can make my cookies look more professional.
cute cookies, gave me a chuckle
I love these! Thanks for sharing the recipe 🙂
Those are super cute,awesome job!
This would be great as a BTS treat for your child’s new teacher!
These are beautiful!!!
I may need to give these a try. I’ve been very into decorating cookies with royal icing the last little bit. I’ve been doing it for my boys’ birthday loot bags.
Very creative! These are super cute 🙂 I love the idea
just in time for back to school treats
If I only had the time to decorate these.
Love them! Especially the little worm. I’m no longer in school and I don’t have any kids but I may make some just to play around with the icing!
These are gorgeous, almost too nice to eat 🙂
These are super cute, almost to cute to eat, but there is no way that I would be able to make these, I’m not that talented or have the patience to do anything like this, it would probably take me a full day just to do one..lol…but I applaud you on the super well done job!!
Very cute cookies! I really need to learn how to use royal icing, so many great things you can do with it!
These are so cute!! Wish I was so talented to create them!! Great for back to school 🙂
I can’t wait to make these
Wow! Thanks for the recipe! These are super cute! Great teacher gift!
ADORABLE! Do you sell?! lol too much work for me but I want them for my daughter’s teachers!!
These are so neat for Back to School, and they look delicious!