This post may contain links to affiliate websites, such as Amazon, and we receive an affiliate commission for any purchases made by you using these links. We appreciate your support!
If you are on a tight budget, but still want to own fabulous and unique furniture, DIY projects are definitely the way to go. This DIY Distressed Table was cheap and relatively easy, but required a lot of my time and hard work. The best part about this DIY in particular is that it cost me barely anything.
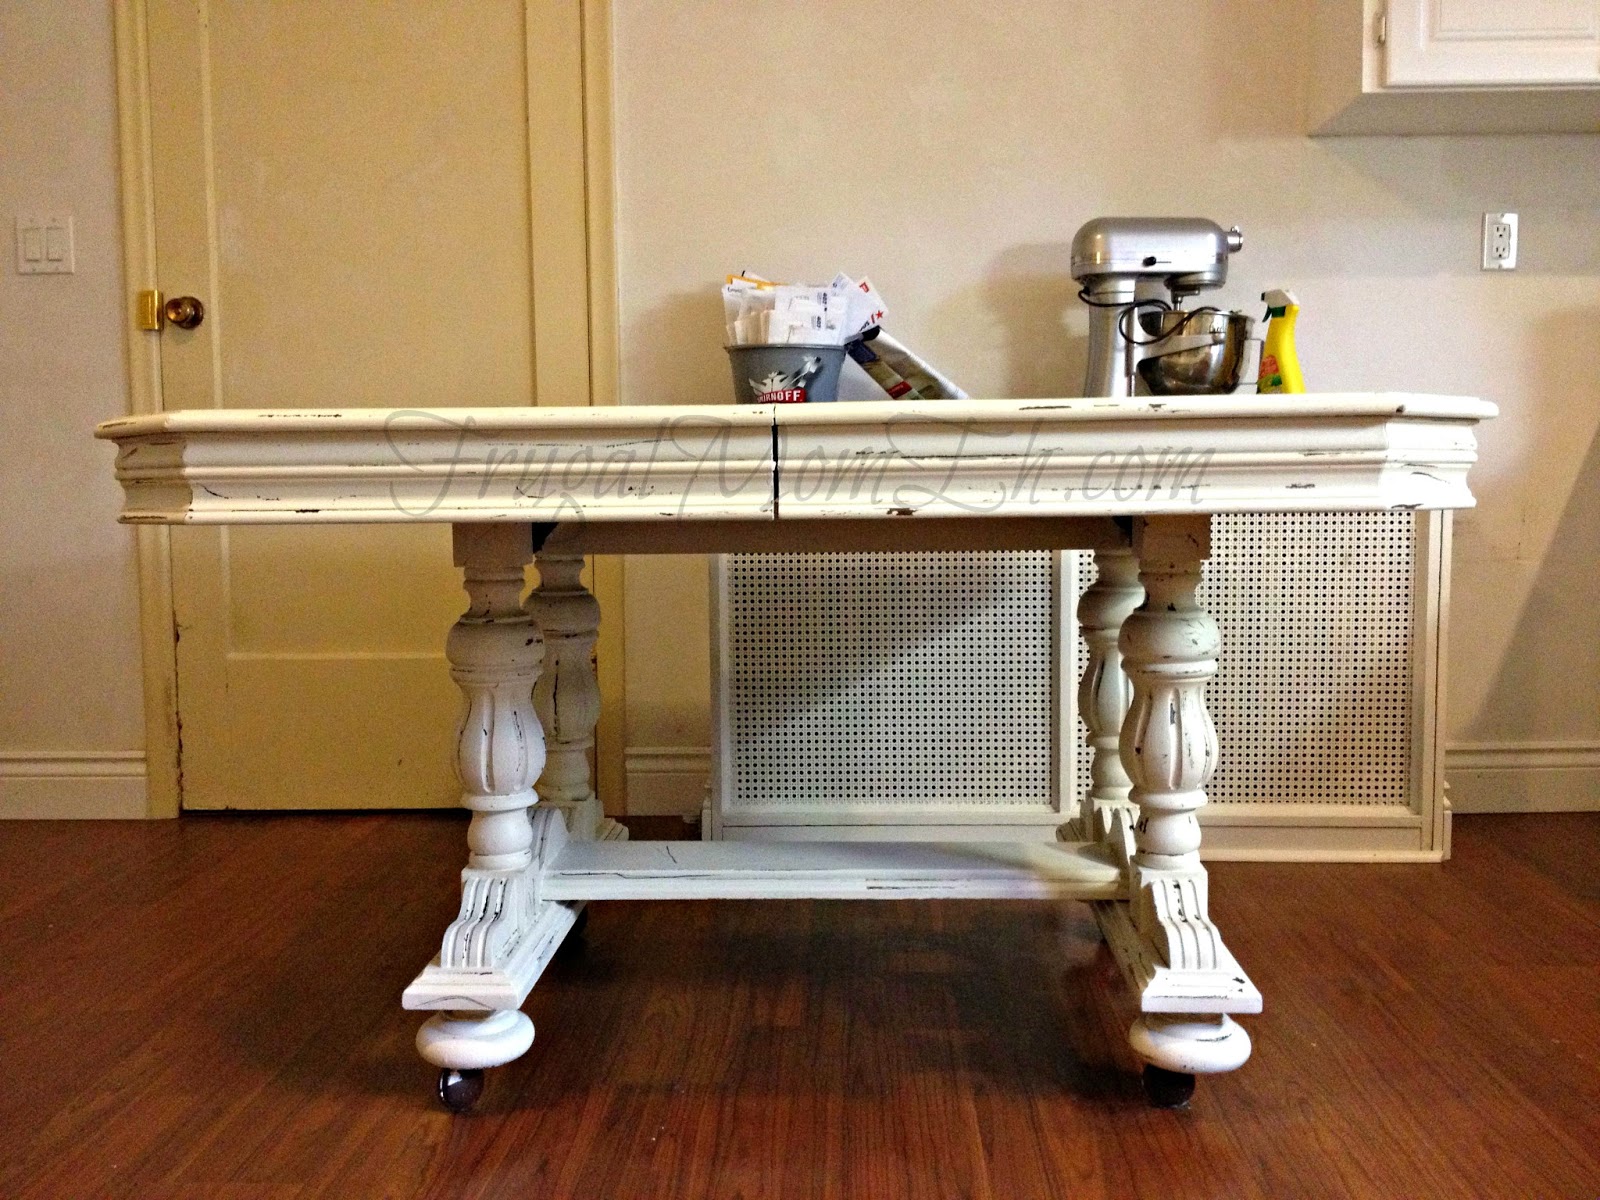
After moving into a new rental unit, my friend came across this formal antique dining room table that her landlord had planned to throw out. I could not believe it! Sure, it wasn’t really in style and my original thoughts were about how gaudy, outdated and dark this table was, but I immediately thought of a million things we could do to make it look amazing! I twisted her arm to make her keep it, but she is thrilled with the results.
When re-finishing or painting any type of furniture, you need to make sure all of the pre-existing finishes are taken off. This table had a shiny varnished finish, but I loved the wood underneath. Since we were looking to create an antique, ‘aged’ look, I didn’t want to destroy the stain on the wood, because I wanted it to peek through the paint in a few spots. I’ve used paint stripper in other projects, but for this one I opted to sand the table down instead. I don’t own an electric sander, so we sanded it by hand making sure that all of the varnish was off and the table was no longer shiny.
Next was the fun part. We wanted to go for a distressed, antique look, so I took an old candle and rubbed it along some of the edges where I wanted the original wood to show through the paint. Paint does not easily cover wax, and the wax also protected the stain of the wood underneath. After going around the entire table, carefully planning out where it would be distressed, we painted the entire thing an off-white to go with the old world feel.
As for the paint, I already had it sitting around from previous projects, but I prefer to use acrylic paint with an eggshell finish (just like you would use on your walls, as it is pretty durable. The table needed two coats of paint, and after we let it dry for a few hours, we got creative with some kitchen tools to give it the distressed look we so desired.
I used butter knives, scissors and pretty much anything with an edge that could take the paint off of the table in certain spots. We then went around uncovering all the areas we had waxed with the candle and scraped off the paint anywhere else we felt would look good.
The best part about distressing furniture is that there is no wrong way to do it! It is supposed to look old and a little beaten up, which is all part of the fun. I didn’t want to put a finish on top of the paint because we loved the matte look so much, so my friend is just careful when scrubbing spills off of the table. Like I said, the paint is pretty durable and can withstand some wear and tear.
Sarah is currently studying Anthropology at McMaster University. She enjoys up-cycling, creating customized furniture, decorative furniture painting and any do-it-yourself projects, big or small. She is passionate about creative sustainability, by breathing new life into items destined for the land-fill.
Elizabeth Lampman is a coffee-fuelled Mom of 2 girls and lives in Hamilton, Ontario. She enjoys travelling, developing easy recipes, crafting, taking on diy projects, travelling and saving money!
I love the painted look of this table and will put it on Pinterest for sure as so many people want to know how to get this look! Thanks for sharing the info.
I love the distressed antique look you managed to get and you actually made it look easy too.You have inspired me to try this on an antiqque table I have and hoe it turns out as nice as yours.Thank you for the post.
I love the antique look, would love to do this with my dining room table when my kids get a little older to hide the scratches they have made to it lol
I’m redoing our 1920’s home and looking for items to add that gives it that acquired look, everything is so expensive, I’m taking the info that I just read and going to do it to a table that I can easily pick up for a few bucks and gonna work some magic, thanks for sharing this post, I’m now inspired!
This is something I’ve been wanting to do for a long time with one of my dining tables. My sister has recently just opened a wood shop called the woodpeckers cabin and shes doing quite a bit of distressed furniture pieces. LOVE the look.
I love the DIY posts on your blog and this table is one of my favourites. I have a few tables that I picked up for next to nothing at the auction. It is going to be a busy summer getting them ready. One table that I can’t wait to get started on is a vintage typewriter table…it is beautiful. Thanks for the inspiration!
This is very creative! I like the look of it. I bet by the end you would have wished for an electric sander. LOL Oh well, it just makes it all that much more *handmade*. Are you doing the chairs too?
I love it!! There’s always extremely cheap pieces of furniture at clearance sales at big-box stores, which have so much potential if you’re willing to put some time into it.


Wow, you did a great job with that!
What a fun project, love the look.
I cant wait for the yard sales to start,hoping to find a nice table to redo
I really like the look of distressed furniture.
I will be watching the yard sales this year for some good pieces
I love the painted look of this table and will put it on Pinterest for sure as so many people want to know how to get this look! Thanks for sharing the info.
I bought a nice dresser at a fall sale and cant wait for spring to redo it
I love the distressed antique look you managed to get and you actually made it look easy too.You have inspired me to try this on an antiqque table I have and hoe it turns out as nice as yours.Thank you for the post.
This looks amazing! Looks brand new! Thanks for this post!
Amazing piece of furniture
I love the look of distressed furniture. Your table turned out beautifully. I look forward to the day that I get the chance to try doing this myself.
I have lots of old pieces of furniture to do this, I think I will give it a try
Lovely! I’ve always wanted to try this! Craigslist is also a great way to get cheap furniture if not free 🙂
I am going to give this a try on an old table
Love it! I look forward to doing this to my table soon!
ok I love this!! And you made it look elegant yet simple!!! great job!
I love it! Great idea! Also a great way to refinish 70-80’s furniture! I love your finished product!
Hmm… successful project, but not really my style.
I love the antique look, would love to do this with my dining room table when my kids get a little older to hide the scratches they have made to it lol
I love the lines and shapes in this table, and the distressing is great. You have done a great job.
That looks great! I always dream of refinishing furniture but can’t quite commit to it!
Gorgeous table! I love doing things like this when I have the opportunity! Thanks so much for sharing!
Love the table, great job! Now I just need to find a good table to try this!
I just love what you did with this table, it looks 100% better now, a job well done.
Great tutorial, I will try this on some of the furniture I find in the alley sometime.
beautiful job! I’ve tried refinishing before with horrible results! i’ll have to try your tips next time! 🙂
I’m redoing our 1920’s home and looking for items to add that gives it that acquired look, everything is so expensive, I’m taking the info that I just read and going to do it to a table that I can easily pick up for a few bucks and gonna work some magic, thanks for sharing this post, I’m now inspired!
It looks Beautiful! I swear my parents have a matching table lol. (in the dark color)
You make it look so easy!! I want to try this on my old wood plantstands!
This is something I’ve been wanting to do for a long time with one of my dining tables. My sister has recently just opened a wood shop called the woodpeckers cabin and shes doing quite a bit of distressed furniture pieces. LOVE the look.
Thanks for sharing.
Kevin Linkie
Beautiful! Great job!
amazing tutorial thanks so much
Our home is decorated very primly…
Thanks for this table, tutorial!
Cindi
Such a great affordable way to get a table that looks awesome and you dont have to pay and arm and a leg for!
I love the DIY posts on your blog and this table is one of my favourites. I have a few tables that I picked up for next to nothing at the auction. It is going to be a busy summer getting them ready. One table that I can’t wait to get started on is a vintage typewriter table…it is beautiful. Thanks for the inspiration!
This is very creative! I like the look of it. I bet by the end you would have wished for an electric sander. LOL Oh well, it just makes it all that much more *handmade*. Are you doing the chairs too?
I love it! Shabby Chic is one of the ways that I love
to decorate our home…
Cindi
Very cool. I love the way distressed furniture looks!
Very cool looking! It’s surprising what people are wanting to throw out – with a little creativity and work you can end up with a super cool new piece
I love it!! There’s always extremely cheap pieces of furniture at clearance sales at big-box stores, which have so much potential if you’re willing to put some time into it.
I definitely think you got the antique look you’re going for! Nice!