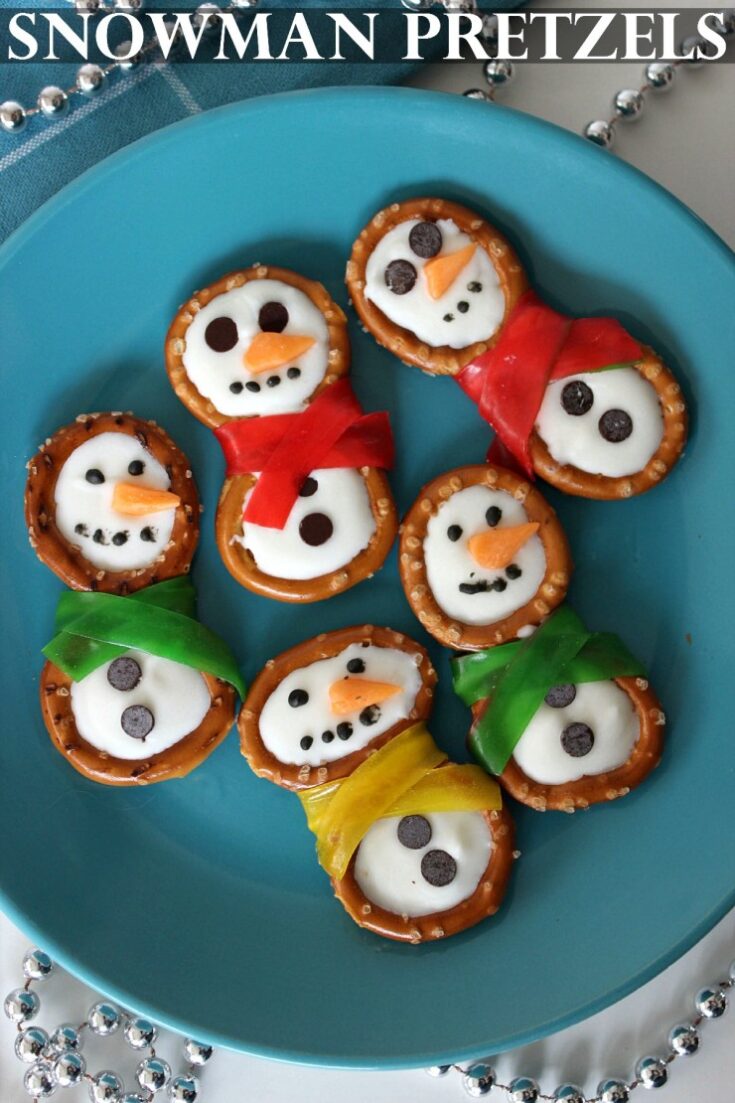
Snowman Pretzels
These Snowman Pretzels are an adorable Christmas or Winter treat perfect for kids!

These Snowmen are super cute and make for great little treats for kids to help get them into the winter spirit!
Snowman Pretzels
Ingredients:
24 Pretzel Rings
1 cup White Candy Melting Chips
3-4 Fruit Roll-Ups
1/4 cup Dark Chocolate Melting Chips or Mini Chocolate Chips
1 Orange Starbursts

Directions:
Cut Starburst into 3 rectangular strips (1/4″ x 3/4″)
Cut each of those in half, creating 6 – 1/4″ x 3/8″ rectangles.
Now cut each of those diagonally creating 12 triangles for noses.
Unroll Fruit Rollup and cut into 1/2″ strips to use as scarves.
Line cookie sheet with wax paper.
Heat White Candy Chips by microwaving for 30 seconds stirring and repeating until melted.
Transfer to corner of zippered bag and clip tiny piece off of corner to pipe.
Lay scarf on prepared sheet and pipe a small dot of candy in the middle.

Place 2 rings so they are just touching at that spot as pictured.
Pipe additional candy on top to better secure them.
Fill the inside of each ring with white candy.
Place nose in upper ring.
If you are using mini chocolate chips for eyes mouth and buttons you need to place them at this time before candy sets. If you are using melting chips you will pipe these on after the white sets.
Fold scarf over to hide the joint.
If you are using dark melting chips, heat them by microwaving for 30 seconds stirring and repeating until melted. Transfer to corner of zippered bag and clip tiny piece off of corner. Pipe eyes, mouth and buttons.
Place cookie sheet in refrigerator for 10 minutes to allow candy to set.
Snowman Pretzels
Ingredients
- 24 Pretzel Rings
- 1 cup White Candy Melting Chips
- 3-4 Fruit Roll-Ups
- 1/4 cup Dark Chocolate Melting Chips or Mini Chocolate Chips
- 1 Orange Starbursts
Instructions
- Cut Starburst into 3 rectangular strips (1/4" x 3/4")
- Cut each of those in half, creating 6 - 1/4" x 3/8" rectangles.
- Now cut each of those diagonally creating 12 triangles for noses.
- Unroll Fruit Rollup and cut into 1/2" strips to use as scarves.
- Line cookie sheet with wax paper.
- Heat White Candy Chips by microwaving for 30 seconds stirring and repeating until melted.
- Transfer to corner of zippered bag and clip tiny piece off of corner to pipe.
- Lay scarf on prepared sheet and pipe a small dot of candy in the middle.
- Place 2 rings so they are just touching at that spot as pictured.
- Pipe additional candy on top to better secure them.
- Fill the inside of each ring with white candy.
- Place nose in upper ring.
- If you are using mini chocolate chips for eyes mouth and buttons you need to place them at this time before candy sets. If you are using melting chips you will pipe these on after the white sets.
- Fold scarf over to hide the joint.
- If you are using dark melting chips, heat them by microwaving for 30 seconds stirring and repeating until melted. Transfer to corner of zippered bag and clip tiny piece off of corner. Pipe eyes, mouth and buttons.
- Place cookie sheet in refrigerator for 10 minutes to allow candy to set.
Nutrition Information:
Serving Size:
1 gramsAmount Per Serving: Unsaturated Fat: 0g
Photos and recipe by Jen for Frugal Mom Eh.


These are real cute,kinds looks like a lot of work
These are so cute!!! I love them!
These would be awesome to make with my grandson , he would really enjoy making these , thanks for sharing they are too cute 🙂
Oh my goodness, these are adorable and they sound delicious! We love sweet and salty snacks! We are definitely going to try this recipe – thanks for sharing!
Those are by far the most creative foodie ‘craft’ I have seen on the site and there have been some pretty darn amazing ones!! They are really cute!!
These are astonishing, really cute, not only kids will love them ;-). I lived in Germany for many years, the land of pretzels, and have never seen them as simple rings.
So cute will be making these guys with the kids
Gosh I do love visiting everyday and seeing what beautiful creations you have for us!! Thank you <3
OmGosh I love this idea! Def going to go in with my christmas ‘baking’
These are so cute! But I do have to ask where did you find the Pretzel Rings? I have been searching all over for them but can’t find them anywhere!
I’ve only ever seen then in the states. If I happen to see them around here though I will let you know where!