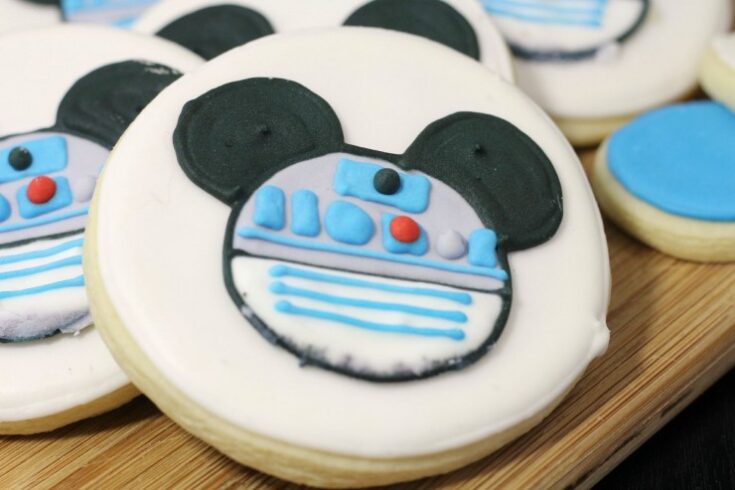
R2-D2 Mickey Mouse Cookies

R2-D2 Mickey Mouse Cookies
Cookie Recipe:
Cookie Ingredients:
5 C flour
2 tsp baking powder
1 tsp salt
1 1/2 C soft unsalted butter
2 C granulated sugar
4 eggs
Cookie Icing Ingredients:
2 egg whites
1 C powder sugar
1/2 tsp cream of tartar
Royal Icing Ingredients:
2 egg whites
1 C powder sugar
1/2 tsp cream of tartar
Cookie Directions:
– Cream the soft butter with the sugar until the combination is smooth not grainy to the touch in a mixing bowl.
-Add all 4 eggs at one time…Continue to mix. -Add the vanilla.. Continue mixing.
-Sift the four, baking powder, and salt together.
-Add the dry mixture to the wet mixture.
-Continue mixing to make sure all ingredients are thoroughly blended.
-Make the dough into a ball, wrap it in cling wrap completely covering the entire dough ball.
-Put in the refrigerator for about 6 hours or overnight. Check to see if the dough is firm.
-Preheat oven to 325 degrees.
-Pull the cookie dough out of the refrigerator and sit it out to soften up a bit.
– Put flour out on the wood cutting board, rub flour on the rolling pin, and work some flour into the batter.
-Roll the dough out on the cutting board and using the circle cookie cutter begin to make your cookies.
-Line the cookie sheet with parchment paper.
-Using a metal spatula move the cut cookie to the parchment lined cookie baked.
-Take the cookies off of the cookie sheet and put on a wire rack to cool completely.
Cookie Icing Directions:–
-Combine all ingredients in a mixing bowl mixing on medium speed for 4 minutes. (except your food coloring)
-If icing is not stiff enough add 1/4 C powder sugar.
-The bowl of icing remains white.
-Spoon the icing into a frosting bag with a #5 tips…. twist the open end of the bag to push the icing to the tip.
Basic Directions for icing:
-Follow the colors and accent colors as displayed on each cookie.
-First step for each cookie is to outline them .
-Allow the icing outline at least 30 seconds to dry before filling the body of the cookie in with the other icing*. ( After outlining all of these cookies you squeeze some the remaining icing into a bowl and add the 1 tsp of water and mix well to get the right consistency .) Leave some of the icing in the frosting bag for additional accent work on each of the cookies. Using a butter knife to spread it from the outlined part inwards to the center.
Royal Icing Directions:
-Combine all ingredients in a mixing bowl mixing on medium speed for 4 minutes. (except your food coloring)
-If icing is not stiff enough add 1/4 C powder sugar.
– Spoon two TBSP of icing into a bowl, add several drops of red gel food coloring. Mix well.
-Spoon five TBSP of icing into another bowl, adding several drops of blue gel food coloring. Mix well.
-Divide the remaining icing into thirds. The first of the third icing stays white in one bowl. The second of the third remaining icing add several drops of black gel food coloring in another bowl. Stir well.
-The last of the third remaining icing add in several drops of grey gel food coloring in a last bowl. Stir well.
R2D2 Mickey:
-Locate a picture of R2D2 Mickey on Google. Print the picture in color. Tape this picture with several small R2D2 Mickey of it on it to a cookie sheet.
-Tape wax paper (covering the copies of the Mickey) to the cookie sheet . Follow the color and features as printed on the paper.
-Using a small pastry bag filled with the black royal icing and a #2 tip. Start by outlining the Mickey first. Fill in Mickey’s ears with the black icing. Allow this to dry for 30-60 seconds.
-Draw a black line in the middle of Mickey to divide him in half. Fill in the bottom half with the white icing. Allow to dry for 30-60 seconds then add three blue lines across Mickeys lower half of his body.
-Fill in the top half of Mickey with grey icing allowing it to dry for 30-60 seconds.
-Add a blue icing line near to the black dividing line in the center of Mickeys body. Make four small rectangles in the blue icing; two on the left side, one of the right side, and one on the
forehead of Mickey. Next add two small blue dots in between the rectangles on the left and the right sides. Add a red dot on top of the second blue dot. Next to the red dot add a grey dot. Add a small black dot on the rectangle on Mickey’s forehead.
-Allow to dry for 5-10 hours.
-Ensure that the image is dry, gently touch one of them with your finger if it allows you to push in on the icing allow it to dry more…. If the image is dry then it will have a hard feeling not allowing you to push in on it.
-Cut the wax paper holding the completed image into squares surrounding the completed R2D2 Mickey.
-Once R2D2 Mickey is dry, carefully peel the wax paper off of the back of the images.
-Using the icing as glue put a couple of dots on the back of R2D2 Mickey to hold it to the cookie.

R2-D2 Mickey Mouse Cookies
Ingredients
Cookie Ingredients
- 5 C flour
- 2 tsp baking powder
- 1 tsp salt
- 1 1/2 C soft unsalted butter
- 2 C granulated sugar
- 4 eggs
Cookie Icing Ingredients
- 2 egg whites
- 1 C powder sugar
- 1/2 tsp cream of tartar
Royal Icing Ingredients
- 2 egg whites
- 1 C powder sugar
- 1/2 tsp cream of tartar
Instructions
Cookie Directions
- - Cream the soft butter with the sugar until the combination is smooth not grainy to the touch in a mixing bowl.
- -Add all 4 eggs at one time...Continue to mix. -Add the vanilla.. Continue mixing.
- -Sift the four, baking powder, and salt together.
- -Add the dry mixture to the wet mixture.
- -Continue mixing to make sure all ingredients are thoroughly blended.
- -Make the dough into a ball, wrap it in cling wrap completely covering the entire dough ball.
- -Put in the refrigerator for about 6 hours or overnight. Check to see if the dough is firm.
- -Preheat oven to 325 degrees.
- -Pull the cookie dough out of the refrigerator and sit it out to soften up a bit.
- - Put flour out on the wood cutting board, rub flour on the rolling pin, and work some flour into the batter.
- -Roll the dough out on the cutting board and using the circle cookie cutter begin to make your cookies.
- -Line the cookie sheet with parchment paper.
- -Using a metal spatula move the cut cookie to the parchment lined cookie baked.
- -Take the cookies off of the cookie sheet and put on a wire rack to cool completely.
- Cookie Icing Directions:-
- -Combine all ingredients in a mixing bowl mixing on medium speed for 4 minutes. (except your food coloring)
- -If icing is not stiff enough add 1/4 C powder sugar.
- -The bowl of icing remains white.
- -Spoon the icing into a frosting bag with a #5 tips.... twist the open end of the bag to push the icing to the tip.
Basic Directions for icing
- -Follow the colors and accent colors as displayed on each cookie.
- -First step for each cookie is to outline them .
- -Allow the icing outline at least 30 seconds to dry before filling the body of the cookie in with the other icing*. ( After outlining all of these cookies you squeeze some the remaining icing into a bowl and add the 1 tsp of water and mix well to get the right consistency .) Leave some of the icing in the frosting bag for additional accent work on each of the cookies. Using a butter knife to spread it from the outlined part inwards to the center.
Royal Icing Directions
- -Combine all ingredients in a mixing bowl mixing on medium speed for 4 minutes. (except your food coloring)
- -If icing is not stiff enough add 1/4 C powder sugar.
- - Spoon two TBSP of icing into a bowl, add several drops of red gel food coloring. Mix well.
- -Spoon five TBSP of icing into another bowl, adding several drops of blue gel food coloring. Mix well.
- -Divide the remaining icing into thirds. The first of the third icing stays white in one bowl. The second of the third remaining icing add several drops of black gel food coloring in another bowl. Stir well.
- -The last of the third remaining icing add in several drops of grey gel food coloring in a last bowl. Stir well.
R2D2 Mickey
- -Locate a picture of R2D2 Mickey on Google. Print the picture in color. Tape this picture with several small R2D2 Mickey of it on it to a cookie sheet.
- -Tape wax paper (covering the copies of the Mickey) to the cookie sheet . Follow the color and features as printed on the paper.
- -Using a small pastry bag fill with the black royal icing and a #2 tip. Start by outlining the Mickey first. Fill in Mickey's ears with the black icing. Allow this to dry for 30-60 seconds.
- -Draw a black line in the middle of Mickey to divide him in half. Fill in the bottom half with the white icing. Allow to dry for 30-60 seconds then add three blue lines across Mickeys lower half of his body.
- -Fill in the top half of Mickey with grey icing allowing it to dry for 30-60 seconds.
- -Add a blue icing line near to the black dividing line in the center of Mickeys body. Make four small rectangles in the blue icing; two on the left side, one of the right side, and one on the
- forehead of Mickey. Next add two small blue dots in between the rectangles on the left and the right sides. Add a red dot on top of the second blue dot. Next to the red dot add a grey dot. Add a small black dot on the rectangle on Mickey's forehead.
- -Allow to dry for 5-10 hours.
- -Ensure that the image is dry, gently touch one of them with your finger if it allows you to push in on the icing allow it to dry more.... If the image is dry then it will have a hard feeling not allowing you to push in on it.
- -Cut the wax paper holding the completed image into squares surrounding the completed R2D2 Mickey.
- -Once R2D2 Mickey is dry, carefully peel the wax paper off of the back of the images.
- -Using the icing as glue put a couple of dots on the back of R2D2 Mickey to hold it to the cookie.
Nutrition Information:
Serving Size:
1 gramsAmount Per Serving: Unsaturated Fat: 0g

Recipe and Photos by Chef Amber of Hot Springs, Arizona for FrugalMomEh.com


Wow,these are really nice i love the design
I have never seen the R2D2 mickey yet, these are adorable!
just in time for the new movie
These are super cute! I’m going to give these a try!
These cookies are absolutely amazing! I will have to make these for my boys! Thanks for the idea!
These are so cute and how creative!
cute and they look and sound delicious but way above my baking comfort level I think
that’s pretty awesome!
Those are so cute! I never seem to be able to nail Royal icing – it’s either too runny or too hard.
These are really cool! I’m impressed.
omg these are too cool!! i have to pass this on to a friend of mine her son would LOVE these
Well done! They look too good to eat 🙂
Such wonderful close-up! My little guys would love these cookies.
I usually don’t have the patience to make frosted cookies, but these look really fun!
These are great! I’d love to try and make them, but I have a feeling they will end up being one of those “Nailed it!” Pinterest posts, lol. I can have fun trying though! Tanks for the recipe & directions!
This looks great and is so intricate! You must have amazing patience!
Definitely going to try thus! Thanks
My goodness these are fantastic, what a great combination 🙂
Very cute! Thanks for sharing 🙂
That is a cool design! I never would have thought of combining those two characters.