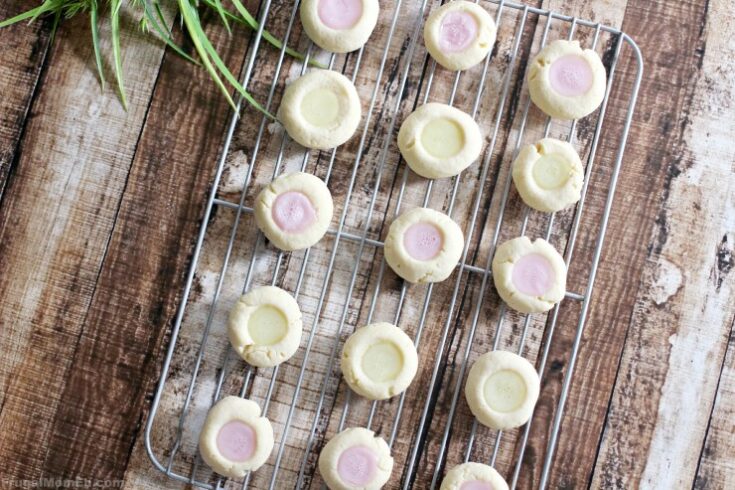
Thumbprint Cookies with Icing
This post may contain links to affiliate websites, such as Amazon, and we receive an affiliate commission for any purchases made by you using these links. We appreciate your support!

Thumbprint cookies are a delicious classic treat usually filled with preserves. This is an easy twist that can be changed up to suit any holiday. Make the icing red and green and they are perfect for Christmas. A little pastel and you are ready to celebrate Easter! Of course they are also good enough to make just because.
Note: Ensure the dough is quite cold before baking to help the cookies keep their shape. It will stop them from flattening out!
Ingredients:
1 cup unsalted butter, softened
1 cup granulated sugar
2 Eggs
1 tsp vanilla extract
3 1/2 cups all-purpose flour
1/2 tsp baking powder
1/4 tsp salt
1 Cup Powdered Sugar
1 tbsp milk
Food Colouring
Directions:
Cream butter and sugar in a large mixing bowl.
Mix in egg and vanilla until well incorporated then add flour,salt and baking powder slowly.
Split dough into half and wrap in plastic.
Refrigerate dough for 1 hr. (Alternatively you can freeze formed dough balls for 12 minutes prior to baking)
Pre-heat oven to 350 F.
Shape dough into small balls about the size of a walnut, and space 2 inches apart on baking sheets.
Use the back of a 1/2 teaspoon to form a “thumbprint” in each ball.
Bake for about 12-15 minutes until lightly brown.
Remove from the oven and allow to cool for 5 minutes before removing to a cooling rack and allow to cool slightly.
Meanwhile, mix together powdered sugar and milk until smooth.
Add 1 drop food colouring in colour of your choice. You should be able to achieve a pastel colour.
Spoon icing into “thumbprint” and allow to set overnight.
Store in an airtight container.
Makes about 4 dozen cookies.

Thumbprint Cookies with Icing
Ingredients
- 1 cup unsalted butter, softened
- 1 cup granulated sugar
- 2 Eggs
- 1 tsp vanilla extract
- 3 1/2 cups all-purpose flour
- 1/2 tsp baking powder
- 1/4 tsp salt
- 1 Cup Powdered Sugar
- 1 tbsp milk
- Food Colouring
Instructions
- Cream butter and sugar in a large mixing bowl.
- Mix in egg and vanilla until well incorporated then add flour,salt and baking powder slowly.
- Split dough into half and wrap in plastic.
- Refrigerate dough for 1 hr. (Alternatively you can freeze formed dough balls for 12 minutes prior to baking)
- Pre-heat oven to 350 F.
- Shape dough into small balls about the size of a walnut, and space 2 inches apart on baking sheets.
- Use the back of a 1/2 teaspoon to form a "thumbprint" in each ball.
- Bake for about 12-15 minutes until lightly brown.
- Remove from the oven and allow to cool for 5 minutes before removing to a cooling rack and allow to cool slightly.
- Meanwhile, mix together powdered sugar and milk until smooth.
- Add 1 drop food colouring in colour of your choice. You should be able to achieve a pastel colour.
- Spoon icing into "thumbprint" and allow to set overnight.
- Store in an airtight container.
- Makes about 4 dozen cookies.
Nutrition Information:
Serving Size:
1 gramsAmount Per Serving: Unsaturated Fat: 0g

Enjoy!


These are so yummy the kids ask for them all the time !!
This would be fun to do with the grandkids thanks
I have made these before at Christmas but never in spring with pastel coloured icing
What a sweet idea. They look so delicate and mouthwatering! Genius 🙂
I never thought of using icing in them (we always use jam). The light yellow is perfect for Easter/spring!
I hadn’t thought of using icing on Thumb Print cookies (Thanks Brandee H for the candy idea too). I hadn’t realized how versatile these cookies could be!
I would love to make these cookies with my son!
These are so beautiful! I have never put icing in my cookies, but I just might!
I loved making thumbprint cookies with my granny growing up. It would be fun to make these with my girls.
I love making thumb print cookies, you can add anything you want to them for all holidays or just because, I’ve done different jams and chocolate, but I don’t think I’ve done icing
These look like they would be amazing eaten when their warm ..mmm thank you so much! I’ve pinned for later!
Those are awesome! You can even make them for color themed parties.
These are so adorable and I love the recipe to make Thumbprint cookies. I think I can make them for the Easter Holiday and get help making these with my sister. Thanks for such a wonderful recipe.
What a fun and neat recipe!! Thanks for the idea, these are so cool and look very yummy!
these would be a super project to make with children. Thanks for the recipe 🙂
these look just cute!
This will be a fun project to do with my son! He will love making the thumbprint! Although he’ll probably want to fill with candy 🙂