Snowy Chocolate Pine Cones
This post may contain links to affiliate websites, such as Amazon, and we receive an affiliate commission for any purchases made by you using these links. We appreciate your support!

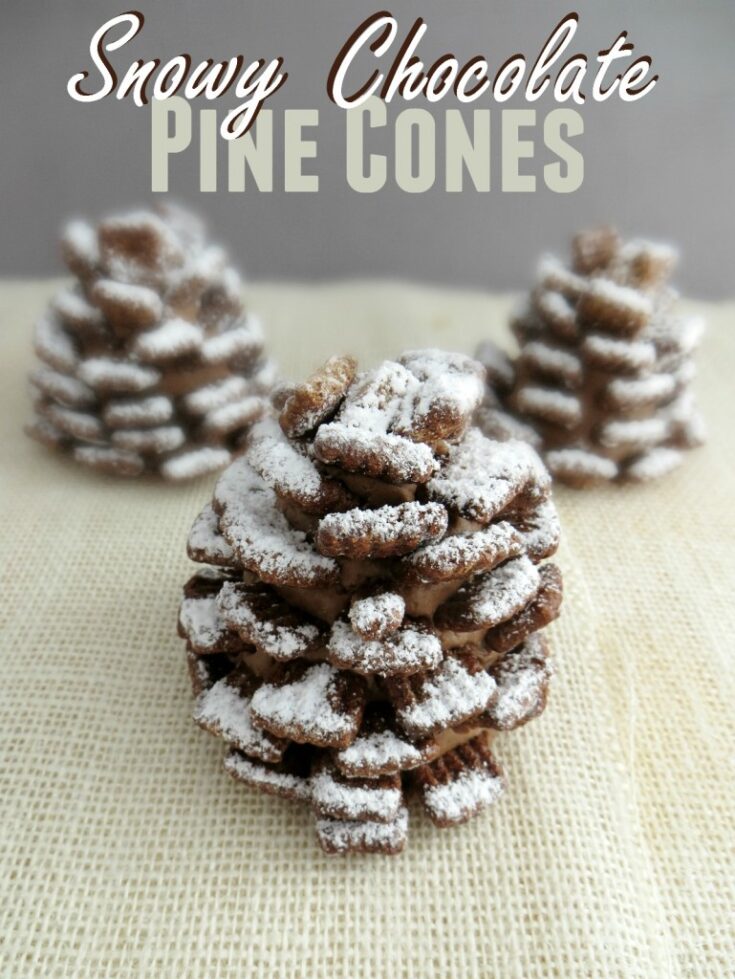
These Snowy Chocolate Pine Cones are a fun treat for any holiday or winter themed party. They are pretty quick and easy to put to put together but delicious too!
SNOWY CHOCOLATE PINE CONES
Yields: 6 servings | Time: 25 minutes
Ingredients:
3 cups Chocolate Fiber One Cereal (can also use Chex Chocolate Cereal)
6 pretzel rods
½ cup peanut butter
¼ cup Nutella chocolate hazelnut spread
3 tablespoons butter, softened
1 cup powdered sugar (+ ¼ cup for dusting on top)

Directions:
- Mix the peanut butter, Nutella, butter and powdered sugar in a bowl
- Take a pretzel rod and mold some of the mixture around it, forming a slight cone shape
- Hold it steady by using the tip of the pretzel as a handle, and start inserting pieces of cereal into the mixture in a symmetrical pattern around the stick. Add more cereal pieces, staggering them as you move upward until you get near the top.
- If the pine cone is getting too tall, cut off the top of the pretzel and add more of the mixture to mold over the top so none of the broken pretzel is showing.
- Break apart cereal pieces to create smaller scales near the top.
- For a “snowy” effect, dust each pine cone with powdered sugar.

Yield: 6
SNOWY CHOCOLATE PINE CONES
Ingredients
- 3 cups Chocolate Fiber One Cereal, can also use Chex Chocolate Cereal
- 6 pretzel rods
- ½ cup peanut butter
- ¼ cup Nutella chocolate hazelnut spread
- 3 tablespoons butter, softened
- 1 cup powdered sugar, + ¼ cup for dusting on top
Instructions
- Mix the peanut butter, Nutella, butter and powdered sugar in a bowl
- Take a pretzel rod and mold some of the mixture around it, forming a slight cone shape
- Hold it steady by using the tip of the pretzel as a handle, and start inserting pieces of cereal into the mixture in a symmetrical pattern around the stick. Add more cereal pieces, staggering them as you move upward until you get near the top.
- If the pine cone is getting too tall, cut off the top of the pretzel and add more of the mixture to mold over the top so none of the broken pretzel is showing.
- Break apart cereal pieces to create smaller scales near the top.
- For a “snowy” effect, dust each pine cone with powdered sugar.
Nutrition Information:
Yield:
6Serving Size:
1 gramsAmount Per Serving: Unsaturated Fat: 0g
This recipe is brought to you by Jen from CincyShopper.com.


Elizabeth, what a stunning display! They look too good to eat. However, since they are made of chocolate, I also do not think I would be able to resist. Cannot wait to show these off.
How far in advance can you make these?
I made these today for my husbands family Christmas and everyone loved them & thought they were very creative and delicious! I was a bit challenging when putting the check mix in to keep the shape together but it’s nice that the powdered sugar hides all of the imperfections! Easy to make and it has the “wow: factor for creativity!
I love these Snowy Pine Cones. They look so cute and make a wonderful decorative Christmas Sweet. Thank you for this recipe.
Oh my gosh, these are so cute! I had no idea these were edible when I first saw the pictures!
Oh I love this going to make this will the grandkids they will enjoy
One of the cutest xmas treats I’ve ever seen! and a great source of fibre lol 🙂
Those are AWESOME!! I could not tell they were edible! I think they would make awesome little gifts for guests when they leave.
Wow, is this ever creative and real good too, I bet
These are so cute! I thought they were real pine cones when I first looked at the picture! Thanks for sharing, these will be fun to make!
Aren’t they adorable! I thought they looked like real pine cones at first too!
Just saw this on the Recipe sharing FB page and I had to come tell you how adorable they are! Love this! So festive!
Thanks!
omg this is totally cool!!! i love it and not difficult to do. definitely bookmarked for later 🙂
They look like real pine cones!!!…buut way more delicious.
Very creative. Thanks for sharing. I am getting so many great ideas from your posts. I also pinned. 🙂