
Acorn Sugar Cookie Decorating Tutorial
Supplies for Decorating:
• 1 batch of your favorite sugar cookie dough baked into acorn shapes of varying sizes
• 1 batch of royal icing
• 1 block of bakers chocolate
• copper gel food coloring
• brown gel food coloring
• piping bag that has been fitted with a #2 round tip
• toothpicks
• decorating bottle for flooding icing

Instructions:
Mix a small amount of brown and copper gel food coloring into the royal icing until desired color has been reached.
Place 1/3 of the royal icing into your piping bag. Cover tightly and set aside remaining icing.
Carefully shave the bakers chocolate into small shavings and set aside.
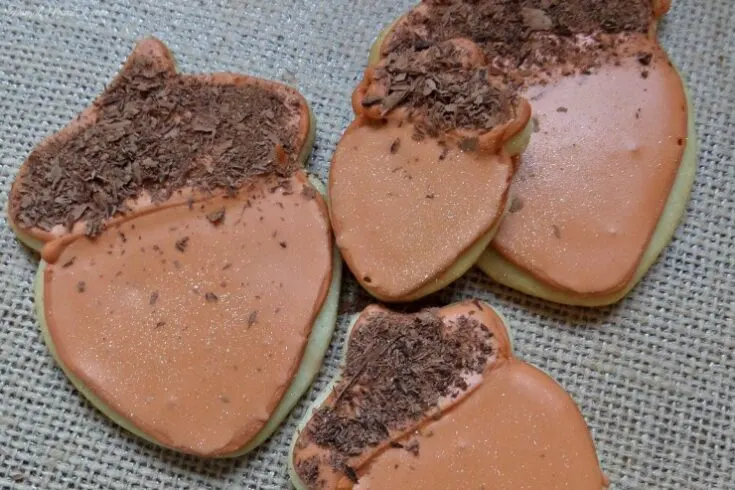
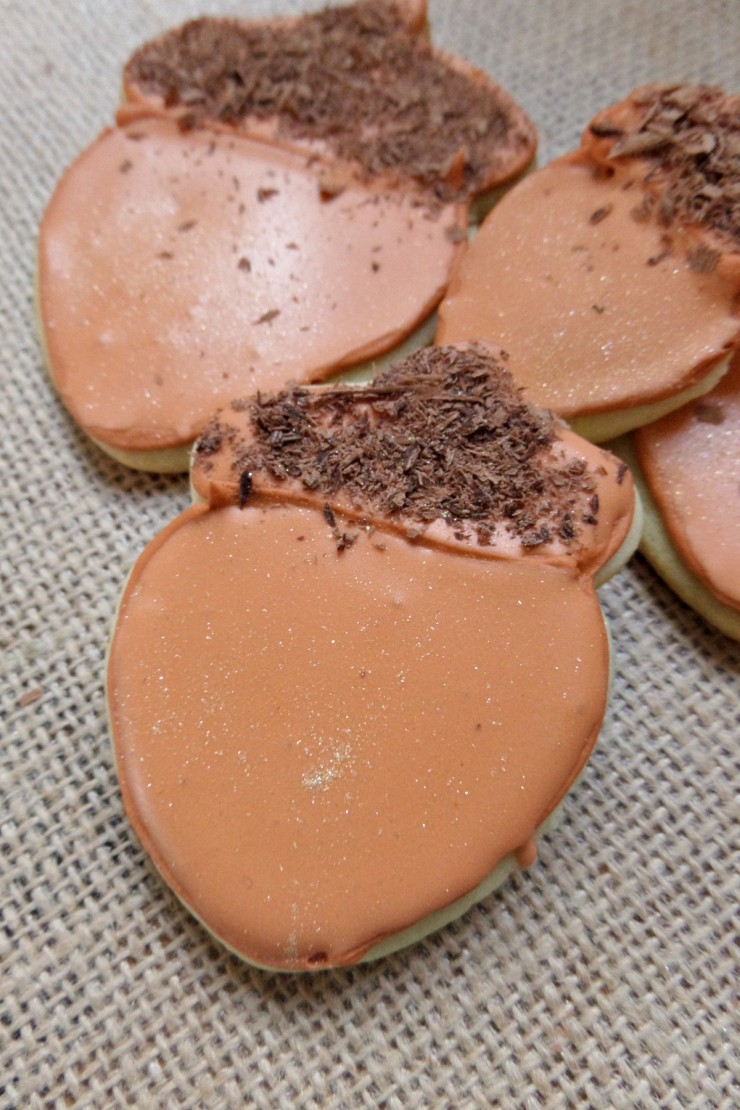
Outline the acorn cookies with the royal icing and piping bag, setting each aside to harden. Add a line of icing to separate the cap from the bottom of the acorn.
Mix the remaining royal icing with a tsp of water and stir well. Continue to add a small amount of water
to the icing until it is thin enough to easily spread but is not overly watery. When stirring, lift the icing up and let it fall back into the bowl. It should take 10 seconds for the icing to blend back together for it to be the right consistency.
Transfer the thinned icing to a decorating bottle.
Spread a small amount of thinned icing onto your first cookie. Use a toothpick to spread the icing across the entire cookie.
While the icing is still very wet, sprinkle a small amount of chocolate shavings onto the acorn cap. Set aside the cookie to allow the icing to completely harden.
Repeat the above steps on each cookie until all are complete.


Acorn Sugar Cookie Decorating Tutorial
Ingredients
- • 1 batch of your favorite sugar cookie dough baked into acorn shapes of varying sizes
- • 1 batch of royal icing
- • 1 block of bakers chocolate
- • copper gel food coloring
- • brown gel food coloring
- • piping bag that has been fitted with a #2 round tip
- • toothpicks
- • decorating bottle for flooding icing
Instructions
- Mix a small amount of brown and copper gel food coloring into the royal icing until desired color has been reached.
- Place 1/3 of the royal icing into your piping bag. Cover tightly and set aside remaining icing.
- Carefully shave the bakers chocolate into small shavings and set aside.
- Outline the acorn cookies with the royal icing and piping bag, setting each aside to harden. Add a line of icing to separate the cap from the bottom of the acorn.
- Mix the remaining royal icing with a tsp of water and stir well. Continue to add a small amount of water
- to the icing until it is thin enough to easily spread but is not overly watery. When stirring, lift the icing up and let it fall back into the bowl. It should take 10 seconds for the icing to blend back together for it to be the right consistency.
- Transfer the thinned icing to a decorating bottle.
- Spread a small amount of thinned icing onto your first cookie. Use a toothpick to spread the icing across the entire cookie.
- While the icing is still very wet, sprinkle a small amount of chocolate shavings onto the acorn cap. Set aside the cookie to allow the icing to completely harden.
- Repeat the above steps on each cookie until all are complete.
Nutrition Information:
Serving Size:
1 gramsAmount Per Serving: Unsaturated Fat: 0g


Elizabeth Lampman is a coffee-fuelled Mom of 2 girls and lives in Hamilton, Ontario. She enjoys travelling, developing easy recipes, crafting, taking on diy projects, travelling and saving money!
M.Clark
Thursday 8th of January 2015
These are cute cookies, I can't wait to give them a try. Thank you for sharing this recipe.
kathy downey
Monday 3rd of November 2014
Thanks the kids will enjoy this
Victoria Ess
Friday 31st of October 2014
This is so cute!! Thank you SO much for the tutorial!
Heidi C.
Sunday 5th of October 2014
My little guy went "acorn" collecting this weekend - he actually went "pine cone" collecting. So maybe I will make these so he know what acorns really are :).
Tina F
Sunday 5th of October 2014
what a cool idea I really like these they look so sweet and the kids would probably get a kick out of them